I used to be just like you.
My email was a goddamn nightmare.
Sure, it started off simple enough, but over the years it evolved into something else — something messy and complicated. There was no real structure, no rhyme or reason. The unread messages started to pile up. It became problematic to find the messages that I needed to respond to in an endless sea of crap I had allegedly signed up for. Opening my inbox was a source of stress. I had to disable notifications on my phone because of the constant irritation. The hundreds of unread messages started reaching into the thousands. My friends, family, and work partners couldn’t rely on a prompt response from me. It was getting worse, and there was no end in sight.
Those days are in the past.
Now, my email functions flawlessly. Every single day I have zero unread messages across all my accounts, and everything is nicely sorted and organized. Smart things happen automatically. My phone will notify me when an important email arrives, but never when it’s something I don’t need my eyes on immediately. I can utilize the most powerful web-based email provider out there, but still have everything looking professional with @mylastname.com addresses (as well as easily creating as many as I need). I can stay on top of every conversation thread with minimal effort. An email hasn’t fallen through the cracks in years, after thousands and thousands of messages. I can fully trust my system, and feel no stress whatsoever.
And I can help you do the same.
How long does this take to solve?
- Maybe half an hour, start to finish. You’ll spend maybe five or ten minutes a day extra for the first week or so, then the time investment becomes negligible. All you have to do is follow the steps that I’m laying out in excruciating detail. From there on out, it’s like compound interest — you’ll be saving a huge amount of both time and frustration.
What do you need to get started?
- Two Gmail accounts; primary and secondary. If you already have one account, it’s likely this is already your primary in some way. Sign up for another if you need to. It is required that you have two Gmail accounts to fully implement this system.
Once you have two Gmail accounts, you are ready to move forward.
How the system looks
After extensive testing, I’ve found that the strongest leverage you’ll get in processing email effectively is to split the incoming stream before the messages ever hit your inbox. Utilizing separate email accounts is by far the easiest way to do this. By segregating your accounts into low- and high-priority, you drastically reduce the psychological barriers to processing electronic communications effectively. I use the following setup:
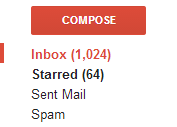
- me@mylastname.com (primary account) – Personal communications only, as in actual living, breathing, corporeal people. My freelance partners, friends, parents, and the like. High priority communications. Checked automatically with IMAP push notifications and linked to my phone. Forwards to my primary Gmail account.
- robot@mylastname.com (secondary account) – Automated everything; any and all signup forms, newsletters, discussion groups, ticket confirmations, Amazon orders, website logins, etc. Low priority communications. Checked manually once or twice a day, and not linked to my phone. Forwards to my secondary Gmail account.
Some people prefer even more addresses than this, but I haven’t yet found a drastic need. However, once you see how the system is set up, you can add extra accounts quite easily to match your preferences.
If you don’t have personalized domain email set up, this will all still work fine. Just use your primary and secondary Gmail accounts in the steps below.
Yes, I realize that your email is not currently split up like this. I will walk you through the transition process; it’s a lot easier than you might expect.
![]()
Configure settings in Gmail
There’s a lot that can be improved from Gmail’s default settings. I’m going indicate what is required for this system setup as opposed to what is merely optional.
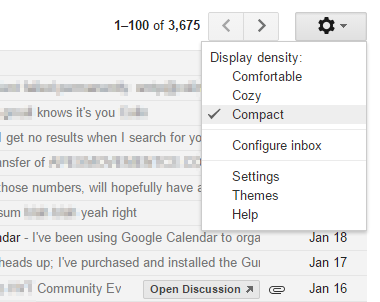
The very first thing we’re going to do is tighten up the layout. Click the gear icon dropdown in the top right corner of Gmail and choose Compact under Display Density. Technically optional, but I hope you’d agree it’s much better than the default.
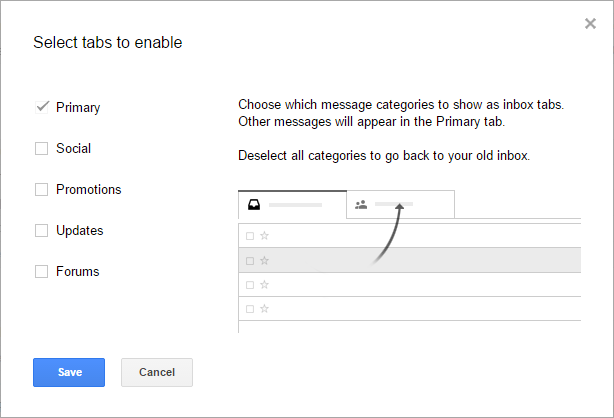
From the same options menu, select Configure Inbox and uncheck everything. This is Gmail trying to help, but your systems will be better than they provide. Their help will only get in the way. Click save to move forward.
For the rest of this, we’re going to be working through Gmail’s Settings dialog. Again, select the gear icon dropdown, but this time, select Settings. I’ll be moving sequentially across the tabs at the top, left to right. Anything I don’t specifically mention below should be assumed to be the default value.
Tab – Labels
Labels comprise the core of this workflow, and GTD fanatics ought to rejoice here. This is a crucial part of the system, so it’s worth spending the time to get it right.
Create three new labels: action, info, and waiting:
- Action is anything still awaiting your attention. Responses that need sent, reports that need pulled, documents that need forwarded. You’re familiar with this sort of thing already. If it needs done and you’re the person to do it, then it represents an action needing to be taken.
- Waiting refers to messages that are on hold for whatever reason. Most of the time it will be because you’re awaiting a response from someone on a particular matter, but sometimes it’s just a thing that doesn’t need addressed quite yet.
- Info is anything that would be considered reference materials. Passwords, support documentation, general information on a product, whatever. If it’s not a thing you have to do, it’s not a thing you’re waiting for, and it’s important in some way, it should probably go here.
Click “Create new label”, enter a new label name, don’t nest it under anything, and click “Create” — these are vitally important to the system workflow. And yes, of course I’ll show you exactly how in a moment.
| Labels | Show in label list | Show in message list | Actions |
|---|---|---|---|
| action | show | show | Show in IMAP |
| info | show | show | Show in IMAP |
| waiting | show | show | Show in IMAP |
Tab – Inbox
- The Inbox Type should be set as Default. When we add in Multiple Inboxes later, it requires you to have a default inbox.
- If it’s not already, uncheck everything under Categories. Your inbox will be far more powerful than most, and will not require crutches such as these.
- Importance markers: No markers. Your system accommodates this and more.
- Filtered mail: Don’t override your filters. Gmail does a great job automagically helping the 99% of people using it. You will be the 1% of power users.
Tab – Filters
Filters all follow a pattern of Condition > Action. For example, you can say “everything from youtube.com (condition) should skip the inbox and be marked as read (action)”, or nearly any variation therein. There are a huge number of things you can do automatically with the Filter tool — in fact, it is one of the most powerful features that Gmail offers, and I strongly recommend you learn more about them on your own time. They are one of the crucial tools in a power user’s kit.
Eventually we will be adding plenty of things in here, but it will be heavily dependent on your inbox contents, and there’s easier ways to create filters. However, there is one filter that we need to create manually and is absolutely required. This actually exploits a mostly unknown and undocumented feature of Gmail, and again, it’s rather crucial to the system. And yes, I will explain why in a moment.
Click Create a new filter at the bottom of the page to bring up the Filter dialog. This will allow us to define our filter condition. Where is says “From” up at the top, enter your primary address (using the examples above, this would be me@mylastname.com). Click Create filter with this search to assign an action to this search result.
Now, the next screen allows us to assign our action. In this case, the action is “Never send it to Spam”. Click Create Filter to save this and move back to the inbox.
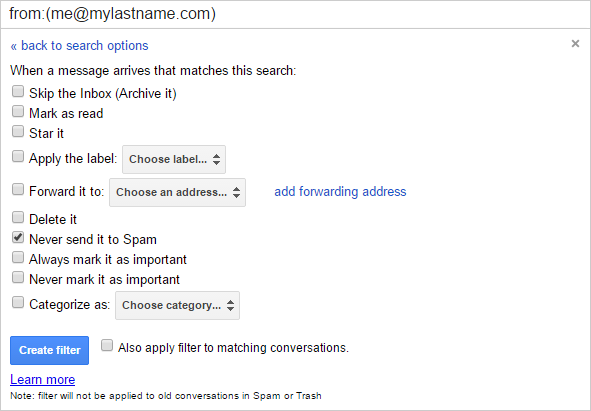
If you’re confused at this point, that’s to be expected. Here’s what’s we just did:
The filter condition we just created matches all email you send from your primary account. Normally, when you send an email, Gmail places a copy of that message in your “Sent Mail” folder. By telling your filter to never send it to Spam, it keeps a copy in your inbox. Yes, that means that all your sent mail will reappear in your inbox (marked as read, of course). This is exactly what we want, and will become very important later when I explain the system workflow. Read to the end if you don’t believe me, but trust when I say that the system as designed depends heavily on this single feature.
Tab – Advanced
Custom Keyboard Shortcuts (optional, recommended)
Most of the Gmail keyboard shortcuts are quite good, and you can see a full listing of them by pressing Shift+? when viewing your inbox. However, by default, next message and previous message are bound to k and j, which just feels backwards to me (and I’ve been using vim for a decade). I use this feature to remap them to their proper bindings. j is forward, k is backward.
On this note, it is definitely worth it to get familiar with the built-in shortcuts. Moving your hand between the keyboard and mouse only takes a second, but when you multiply it by hundreds of times a day, it starts to add up. Seriously. You will work faster and become more confident with your actions.
Multiple Inboxes (absolutely required)
This one is so important, that it gets it’s own section later. From Google:
Add extra lists of emails in your inbox to see even more important email at once. The new lists of threads can be labels, your starred messages, drafts or any search you want, configurable under Settings.
Once you save your options, this will add another tab to your Settings for Multiple inboxes.
Tab – Multiple Inboxes
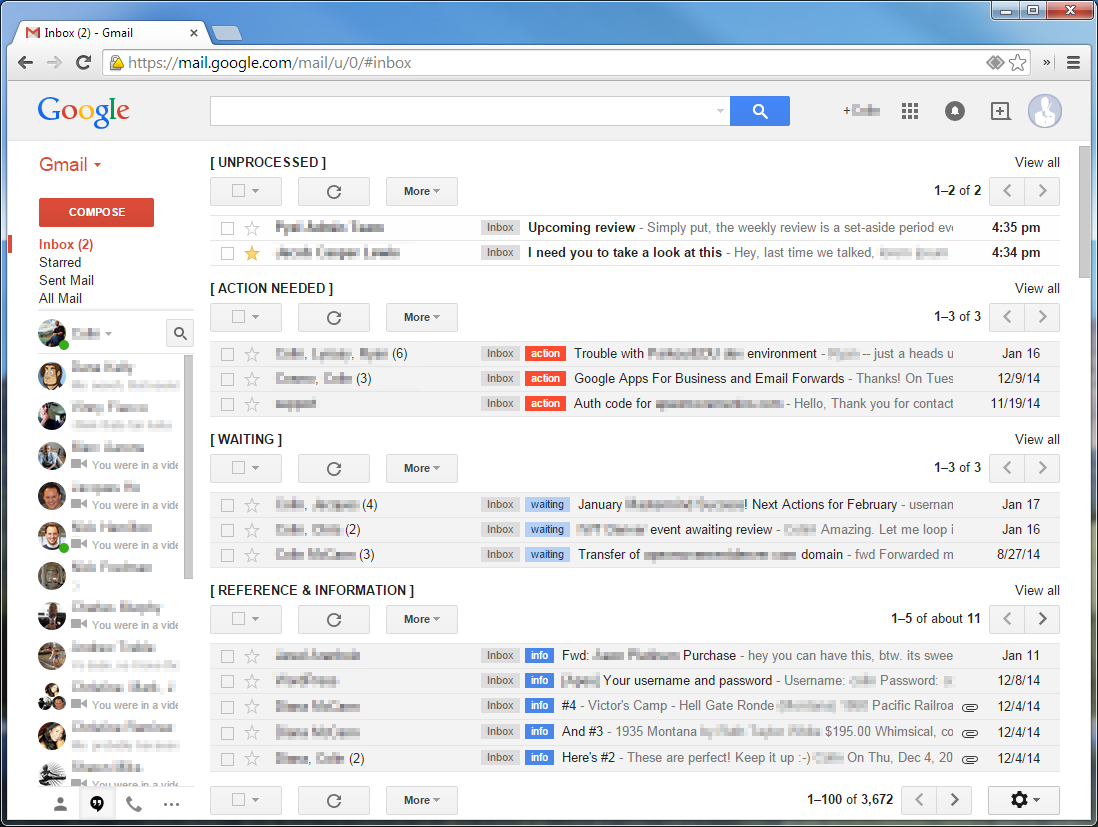
This is where the magic happens. Remember that sexy looking inbox at the beginning of the article? Remember how you immediately though “man, I wish my inbox was that organized.” Here’s where we do that.
The way this works is by configuring searches and displaying the results in their own pane. This is massively powerful and cannot be emphasized enough. If you master this, you will find that you have mastered yourself. Or something like that.
Choose a sensible value for the Maximum page size (I find that 10 messages suits me well), and set the Extra panels positioning radio selector to Above the inbox (it looks pretty ugly off to the side). Now we need to fill in our search queries:
| Search Query | Panel Title |
|---|---|
| has:yellow-star OR (is:unread OR has:yellow-star) | [ UNPROCESSED ] |
| (is:starred OR label:action) AND in:inbox | [ ACTION ] |
| (label:null OR label:waiting) AND in:inbox | [ WAITING ] |
| label:null OR is:draft OR is:snoozed | [ DRAFT & SNOOZED ] |
“Hey, wait a second!” I can hear you thinking, “we never created a NULL label earlier!” — and you’re absolutely right. We’re exploiting another Gmail trick that nobody ever bothered to write about. By using a conditional query (the big OR in there), Gmail will always display the label to the left of the message, and it doesn’t appear to care if the label exists or not. If you only used something like “label:action”, it would remove the tag display entirely and simply list your messages there. Yes, technically that works fine, but I like to have a bit more visual impact by displaying the colored tags. You can see an example of that in the screenshot I included all the way at the top of this article.
And since you’re wondering already, you can change the label color by clicking the little dropdown arrow that appears when you hover over the label title in the left-hand sidebar when viewing your inbox. Holy run-on sentence, Batman!
My secondary Gmail account is set up in an identical fashion, but the tags are slightly different:
| Search Query | Panel Title |
|---|---|
| has:yellow-star OR is:unread OR (is:starred AND has:nouserlabels) |
[ UNPROCESSED ] |
| label:action OR label:null | [ ACTION NEEDED ] |
| label:newsletter OR label:podcast | [ NEWSLETTERS & PODCASTS ] |
| label:tickets OR label:orders | [ TICKETS & ORDERS ] |
The convoluted query for UNPROCESSED in this inbox allows me to star messages that may be previously auto-labeled and have them show up at the top. Otherwise they continue to appear in their respective sections below. Just a personal preference.
Pretty cool, huh?
Tab – Keyboard Shortcuts
You can change everything you like in here to your heart’s content. I use this massively powerful control panel to change “Newer conversation” from k to j, and “Older conversation” from j to k, as described above. Trust me, I’m a power user.
Once you’re done with all that, and if you haven’t already, click “Save Changes” at the bottom. We’re pretty much done!
Now all I need to do is show you how to use this crazy machine.
![]()
Putting it all together – how this system works
The system is complete. Congratulations are definitely in order. Nice work.
Now what?
Well, now you get to actually use it. And I have a feeling you’ll be quite surprised at how fluid this is. Let’s work through a few examples.
You get an email and need to respond
Step one would be to click it. Or, since your hands are on the keyboard anyway, from your Inbox view you can press j and k until the email in question is selected and press Enter to open it. Let’s assume it’s someone asking you about something (as often happens). You can either press the Reply button (or Reply All, if it’s a group), or press the appropriate keyboard shortcut (r for Reply, a for Reply All) to open the message dialog. Type your message, then press Ctrl+Enter to send.
Yes, you can use the mouse for all of that, but it’s much faster to use the keyboard. Again, learning the keyboard shortcuts — and there’s really only about 10 that you need to learn — will massively speed up how you handle email.
Here’s the really neat part.
It’s possible that the email you just fired off was the culmination of that conversation, and no further action is necessary. However, it’s much more likely that your email was one in what will assuredly be a chain of back-and-forth. Ergo, you’re waiting for a response. All that work we did above is about to make things dead simple.
Let’s jump back in time a few seconds — you’ve just sent the email, and Gmail is showing you the conversation thread. The message you received at the top, the response you just gave at the bottom. As you’re waiting for a response, let’s go ahead and apply the waiting label so this doesn’t get lost.
The keyboard shortcuts here couldn’t be simpler. Just press l (lowercase L) to bring up the label dropdown, and start typing the name of the label — in this case, waiting. You’ll notice that as soon as you start typing, Gmail helps you autocomplete with it’s best guess, which is accurate the vast majority of the time. Once the appropriate tag is selected, press Enter to assign it.
Nice job, kid. Now you’re not going to let that one slip through the cracks. Your request for more information has been properly tagged, and will show up near the top of your inbox until something happens. So pro.
Now, you can continue moving through conversations by pressing j or k to move forward or backward, or press g (go) then i (inbox) to get back to your Inbox.
Wasn’t that easy? I know I used a lot of words to describe it, but I want to emphasize how fast this action is. In a condensed form, what you just did was:
j (select and read message), a (reply all, type your response), Ctrl+Enter (send response), l (label dropdown), wa (“waiting”, which autocompletes), Enter (assign label), gi (go back to the Inbox). And you never had to use the mouse.
That entire process, excluding the reading and typing, takes seconds. Seriously, these keyboard shortcuts will save your life.
So, what else will we deal with?
You get an email and need to do something with it
In this instance, we’re going to assume that it’s something you’re not able to take care of right away. It is, in GTD parlance, a “pending action” that will require you to address it at some point in the future. These messages tend to be the ones that get lost and forgotten. They make you feel bad when someone has to follow up again. And unfortunately, they have a decent probability of making you look like an idiot (especially if this was, say, something from your boss).
We don’t want to forget about this, so let’s take care of it properly. The process is very similar to the above.
You already know that j and k can move back and forth between emails (wasn’t that handy to learn? yes, yes it was), so we select the message in question and press Enter to open it up. Hmm, it looks like this is a thing that we can’t (or won’t) do just yet. It’s an action, so we should label it as such. Same as above:
j (select and read message, decide you need to do something with this later), l (label dropdown), ac (“action”, which autocompletes), Enter (assign label), gi (go back to the Inbox).
Boom. Now you’re not going to lose that. You will deliver that TPS report and your boss won’t ask you to come in on Saturday. Nicely done.
You get an email and need to keep it on hand
Maybe it’s the password for a Dropbox account. Maybe it’s the company credit card info. Maybe it’s contact information for your sales rep. Possibly the access codes to launch a nuclear warhead. Whatever it is, there are two things in common: It’s important, its’ not a thing you’re waiting on, and it’s not an action you need to do. Most reference information falls in this category.
You already know where I’m going with this, don’t you?
j (select and read message, decide to keep it around), l (label dropdown), in (“info”, which autocompletes), Enter (assign label), gi (go back to the Inbox).
I’m impressed. You’re getting quite good at this.
Now, if you were to take a look at your inbox, you would see something very similar to the screenshot at the top of this article.
- The email you still need to take action on is highlighted near the very top of the inbox.
- The email you’re waiting on a response to is in the section just below that.
- The password you just saved is in the final section.
All nicely separated, labeled, and ready for you to do whatever you need to. Any unread or starred messages are highlighted at the very top, helpfully labeled as unprocessed.
A quick note: As you get better at this, you may find yourself presented with a particularly subtle annoyance. There is a very slight delay between when you press l (open the label dropdown), and when you start typing the name of the label, where Gmail doesn’t accept text input. It’s less than half a second, but if you’re a fast typist, you’ll probably find that it skips the first letter of your label. Instead of typing lac (for label, action) or lwa (label, waiting), you need to add a very slight pause. Just something to keep in mind. The system isn’t broken — you’re just so badass, it’s struggling to keep up with how awesome you are.
Anything else we need to cover? Actually, yes.
You get an email that’s not from a real person
This will happen a lot, especially as you transition from a single mess of an account to the two nicely separated accounts we’ve set up above. But, as I said, the transition process is quite easy. When you get an email that’s from a robot of some sort, you’ve got a few options:
- Unsubscribe. More often than not, it’s some crap you don’t even care about. Click that unsub link at the bottom and be done with it.
- Visit the website in question and update your email preferences to reflect your secondary account. I recommend this for the vast majority of cases. Things like Amazon, Paypal, eBay, and most any site you want to maintain an account with. Yes, this takes time (roughly 2-3 minutes per site), but you only ever have to do it once. It’s worth it.
- Create a forwarding rule. Sometimes, for whatever reason, you will be unable to do either of the above options. Things like Google Play purchase receipts are a good example: As I’m an Android user, when I buy an app on the Google marketplace, it sends a confirmation to the email address on the account. Unfortunately, it’s my primary account — as that’s what is linked to my phone — but I can’t change the account settings without screwing all sorts of things up.
How to add a forwarding address
These are pretty important, and not overly complicated to set up. Also, once you do it once, you very rarely ever have to do it again. Here’s how:
Click the gear icon dropdown to select Settings, then click the tab labeled Forwarding and POP/IMAP. At the top of the screen, to the right of “Forwarding“, there is a button labeled “Add a forwarding address” — click it. It will bring up a prompt asking to you enter the email address you wish to forward to. Fill it in with your secondary account (in this example, I’m using robot@mylastname.com).
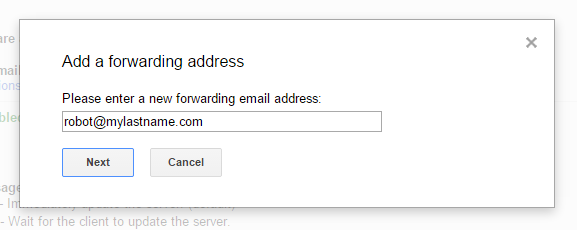
Once you click Next, Gmail will ask you to confirm the address. Go ahead and click Proceed to get your confirmation code. Gmail will send an email to your secondary account verifying that you own both addresses, and that you’re able to receive email at the new location. You’ll have the option of either clicking a link in the email or copy/pasting a confirmation code. Either one works fine. Once you’ve verified your forwarding address, you can start using it to your advantage.
Apologies for the detour — we only have to do that once. Now we can get back to what we were doing.
Using the forwarding address in a filter
So, you’re in your primary account, and you’re looking at an email that you don’t want to unsubscribe from, nor can you update the account to reflect your secondary account. As I said before, forwarding addresses are the solution.
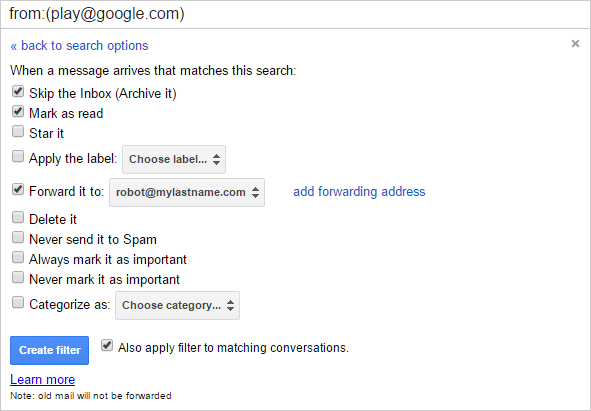
To create a forwarding filter, click the More dropdown above the email, under the search bar. Select “Filter messages like these” to be brought to the filter dialog. It will auto-fill the From address to whoever sent you the email, and in the background, you’ll notice that the messages being displayed are all messages that match the filter as it currently exists. If the messages that you’re seeing are all messages that should definitely be in your secondary account, click Create filter with this search to move to the next step.
Since we don’t even want to see this email in our primary account, go ahead and check the first two options: Skip the Inbox (Archive it) and Mark as read.
About halfway down, you can see “Forward it to:” and a dropdown that says “Choose an address…” — click that, then select the forwarding address that you just enabled in the previous step. Make sure the checkbox to the left of that is checked, and you’re ready to create your filter. Click Create filter to enable the new rule. Now, whenever you get an email that matches the filter parameters, it will be marked as read, immediately archived, and a copy will be forwarded to your secondary account.
See? I told you it was easy.
Deleting and archiving email
Don’t.
What?
You heard me. Don’t. You don’t need to delete it, and you don’t need to archive it either.
I can already hear the Inbox Zero fanatics freaking out. Hey, chill for a second. Let me explain.
- First, Gmail isn’t really going to limit you on space. You don’t need to worry about things getting jammed up because you have too many emails. You can always bulk delete stuff that’s obviously old and no longer needed.
- Second, everything you need to have your attention on will be in one of the multiple inboxes we set up above. If it’s not, then it’s because you didn’t label it correctly in the first place. This happens so rarely as to barely be worth mentioning.
- Third, if you’re dead set on going for Inbox Zero, what you should really be focusing on is Zero Unprocessed Emails. After all, isn’t that the point? Using this workflow will handle that nicely.
- Fourth, if (for some unknown reason), you need to find an email that you didn’t properly label, guess what Google is good at? Yeah, search. Big surprise.
Gmail has massively powerful search features built in. Press “/” (slash) to focus on the Search input, and give it your query. Press Enter to retrieve the results. Some useful examples:
| Search Query | Result |
|---|---|
| is:unread | Display all unread emails |
| has:attachment | Show all emails with attachments |
| label:info | Retrieve all emails labeled “info” |
| from:jsmith@domain.com | Find all emails from John Smith |
Your inbox will continue below your curated sections at the top of the page. Don’t worry about it. You’ll quickly find that it’s quite easy to ignore.
For a full listing of Gmail’s search capabilities (worth reading through, and you’ll probably want to bookmark it as well), visit their page on Advanced Search.
This is also why we don’t need to bother with Folders or any other sort of hierarchical organization. An email is not a physical entity, and as such, has no limitations against being accessed through multiple avenues. Between labels and searching, I guarantee you won’t miss folders one bit.
Smartphone use and the Gmail application
Google wants to control the flow of your email. Personally, I don’t like how they’re going about it, although I acquiesce that it makes a lot of sense for most people. I am not most people, and using this system, neither are you. The system I’ve laid out above is, in my opinion, superior in a lot of ways, and interaction with my phone is definitely one of them.
Since my primary account is nicely curated, I can leave notifications enabled on my phone and not be totally overloaded with hundreds of emails per day. As an Android user, this is extra important, as my primary Gmail account is very tightly coupled to my smartphone. Right now, the only time my phone makes noise because of an email is when a living, breathing person is trying to contact me. However, unless it’s a quick reply, I much prefer to respond in full with Gmail’s desktop interface.
It’s easy. If my phone goes *ding* and an email shows up, I have a few options:
- If it’s something I need to respond to immediately (rare), I can read the message and fire off a quick reply.
- If it’s something I don’t need to do anything about (more common), I can read it and then close the app.
- If it’s something I need to do, but I’m not able to at the moment, I can read the message, then simply click the star icon in the top right corner. Now, next time I look at my inbox, my starred messages will all be nicely grouped at the very top under UNPROCESSED. From there, the workflow continues as normal. Remove the star when you’re done with it. Don’t want to waste stars, y’know?
This is also why this system is centered around labels and not stars — while custom stars can be quite useful for this sort of thing (and admittedly look pretty nice), you’re not able to use more than the default star with the mobile interface (at least, at the time of this writing, January 2015).
Bonus Features (going from good to great)
This section is all about the icing on the cake. Your setup is already better than it ever was, but now we can really polish things and take it to the next level. Read on to find out how.
Use the built-in account switching
Google also offers a convenient way to switch between accounts. Click your profile picture in the top right corner, and in the dropdown menu that appears, click “Add Account” — follow the steps to integrate as many Google accounts as you wish. You’ll definitely want to do this with your primary and secondary accounts, but if you feel like adding more, you can do that here.
Sign up for unroll.me
You’ll definitely want to do this for your secondary (not primary) account. You know, the one that gets all your newsletters, forum updates, order confirmations, and the like? These two things play perfectly together. Also, it’s free.
They do a great job of walking you through how to use the service, so I won’t cover it here. Just head on over to their website, sign up, follow the instructions, and wonder how you ever lived without it. Seriously, it’s that good.
Maybe once every month or so, you’ll want to go through your unroll.me lists and clean things up, but I’ll leave that up to you. It’s pretty simple.
Control your social notifications
Chances are, you get a lot of email that you don’t care about. Someone tags you in Facebook, someone follows you on Twitter, someone favorites one of your Instagram shots. You know, the type of email that they send you even though you get a notification every time you visit the website?
Yeah, get rid of this crap. It’s worth spending a few minutes in the notification settings of your social media accounts and disabling emails for things you’ll be notified of just by using the application. A few minutes on each of your different accounts will save you a few thousand emails per year.
Plus addresses (address+keyword@gmail.com)
Every now and again, you may want to create an address that goes to either your primary or secondary accounts, but for whatever reason, you don’t have the utmost confidence in how your address will be treated. You can use what’s called “plus addressing” to give a little bit of extra control. This is especially powerful in conjunction with the ability to create new forwarding addresses from your Dreamhost account.
For example, I was recently searching for an apartment. In the “housing wanted” ad that I had created, I listed my email address as best_tenant_ever@mylastname.com — now, since certain websites are notorious for spam harvesting, I wanted to be careful with my this. By creating the “best_tenant_ever” address as a forwarding account in my Dreamhost control panel (see above, Step 3) and forwarding it to primaryaccount+craigslist@gmail.com, I had full control over what happened with that address. At any point, I could modify or delete the address, depending on my needs.
You won’t need to use this often, but it can come in handy in a pinch.
Temporary and disposable email addresses
If a website is asking for your email, and you know full well that you have zero intention of ever interacting with that site again (but hey, maybe you want that free download), don’t use your real address. There are a number of disposable create-as-needed free services out there. The one I use most often is Mailinator. The best part is how tremendously easy it is to use: Simply make up an email address whenever you need one that ends in @mailinator.com, then visit Mailinator and enter the name you just made up to check the inbox. No passwords, and the account auto-deletes in a few hours. Very handy.
Calendar invites to your Primary account
As you use your new me@mylastname account, you’ll probably run into an issue where someone sends you an invite for Google Calendar and you’re unable to accept. When you click “Yes” you’ll be greeted with a big red error that says “Google Calendar invitations cannot be forwarded via email” — thankfully, there’s a workaround for this: Add alternate email addresses for calendar scheduling.
Hat tip to Marc Aarons for this solution. It’s actually included in the Gmail settings by default, but you have to turn it on. Check it out.
I’d say leave a comment if you enjoyed the post, but I disabled those. Do something nice for someone today instead.